
Paint is a drawing tool you can use to create black-and-white or color drawings that you can save as graphic files. Paint is very basic but it can do some important tasks. You can also use Paint to send an image in e-mail and convert an image from one format to another. Here you will learn the basic use of Paint and saving files.
Using Paint
To open Paint, click Start, point to All Programs, point to Accessories, and then click Paint.
For information about using Paint, click the Help menu in Paint.
For more information, click Related Topics.
Using Microsoft Paint
Creating a new image
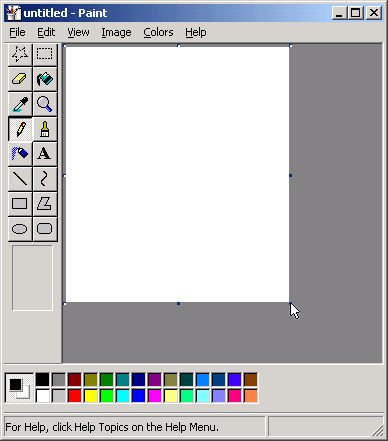
To begin, adjust the image size by clicking and dragging the small box at the bottom right corner (as shown below). Alternatively, click "Image" -> "Attributes..." and set the picture size manually by typing in the width and height in pixels.
Using the Paint "Tools" to create or edit an image
Selection tools: The two selection tools allow you to select a part of the image. You can move a selection around by clicking and dragging it, or resize the selection by clicking and dragging the midpoints on each side.
Eraser tool: Use to erase
Paint Bucket: Use this tool to fill in areas
Eye Dropper: Once this tool is selected, you can move your cursor over the picture and select any color you come across.
Magnifying Glass: When this tool is selected, click on an area of the screen and you will zoom in on that point. To return to the normal zoom click the magnifying glass tool and click the screen again.
Drawing Tools: Pencil, Brush, and Airbrush. Use these tools to draw freehand.
![]()
Text Tool: To create a text frame, hold down the left mouse button and drag the pointer diagonally to the size you want. You can enter text in a text box only once. After you click outside the box, you cannot make it active again.
Line Tools:
Straight Line: Click and hold the mouse button as you move the cursor. Let go when you have the line you want.
Shape Tools: Use these tools to easily draw a variety of different shapes. Use the options below the tools to vary your shapes.
Changing the size of a selected area
Use one of the selection tools to select a part of the image to change.
At the bottom of the toolbox, do one of the following:
Click to apply an opaque background.
Click to apply a transparent background.
Click "Image" -> "Stretch/Skew"
Under Stretch, type a percentage amount to stretch your picture horizontally or vertically.
Under Skew, type the number of degrees to skew your picture horizontally or vertically.
Changing the size of your entire image
This is similar to the previous task, only now we're changing the size of the entire image instead of a selected area.
Click "Image" -> "Stretch/Skew".
Under Stretch, type a percentage amount to stretch your picture horizontally or vertically.
Copying and Pasting
Use a selection tool to select an area of your picture that you want to copy
Click "Edit" -> "Copy"
At the bottom of the toolbox, do one of the following:
Click to paste with an opaque background.
Click to paste with a transparent background.
Click "Edit" -> "Paste". Your selection will appear in the top left corner of your picture. Click and drag your selection to move it around.
Saving Files
By default, Paint saves files as bitmaps (.bmp). It saves in other formats as well. JPEG have a smaller file size and are good choice for photos. GIF also has a smaller file size and is good for line art images like text and logos. Typically, when you create a screen shot, you should use the JPEG format.